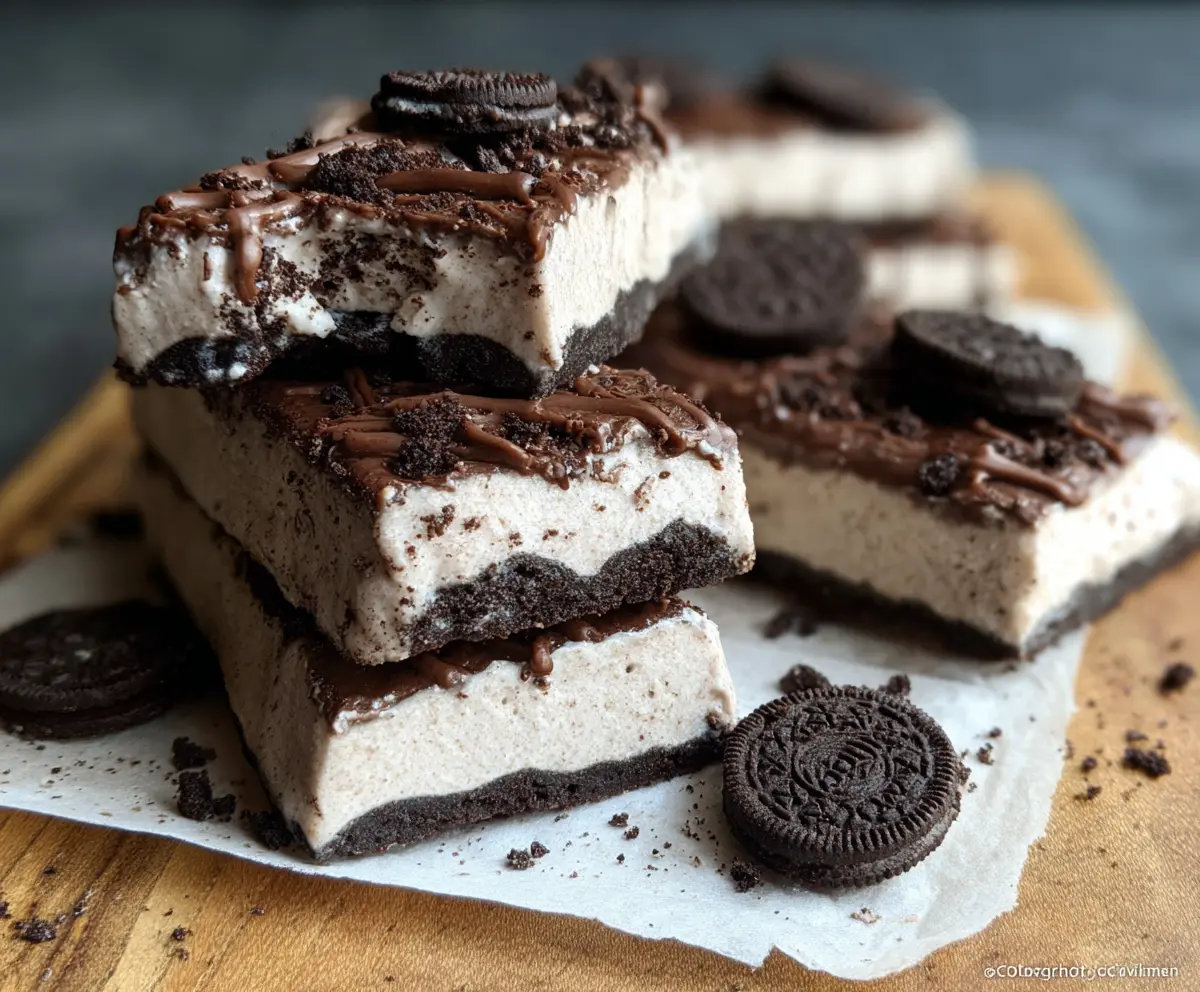
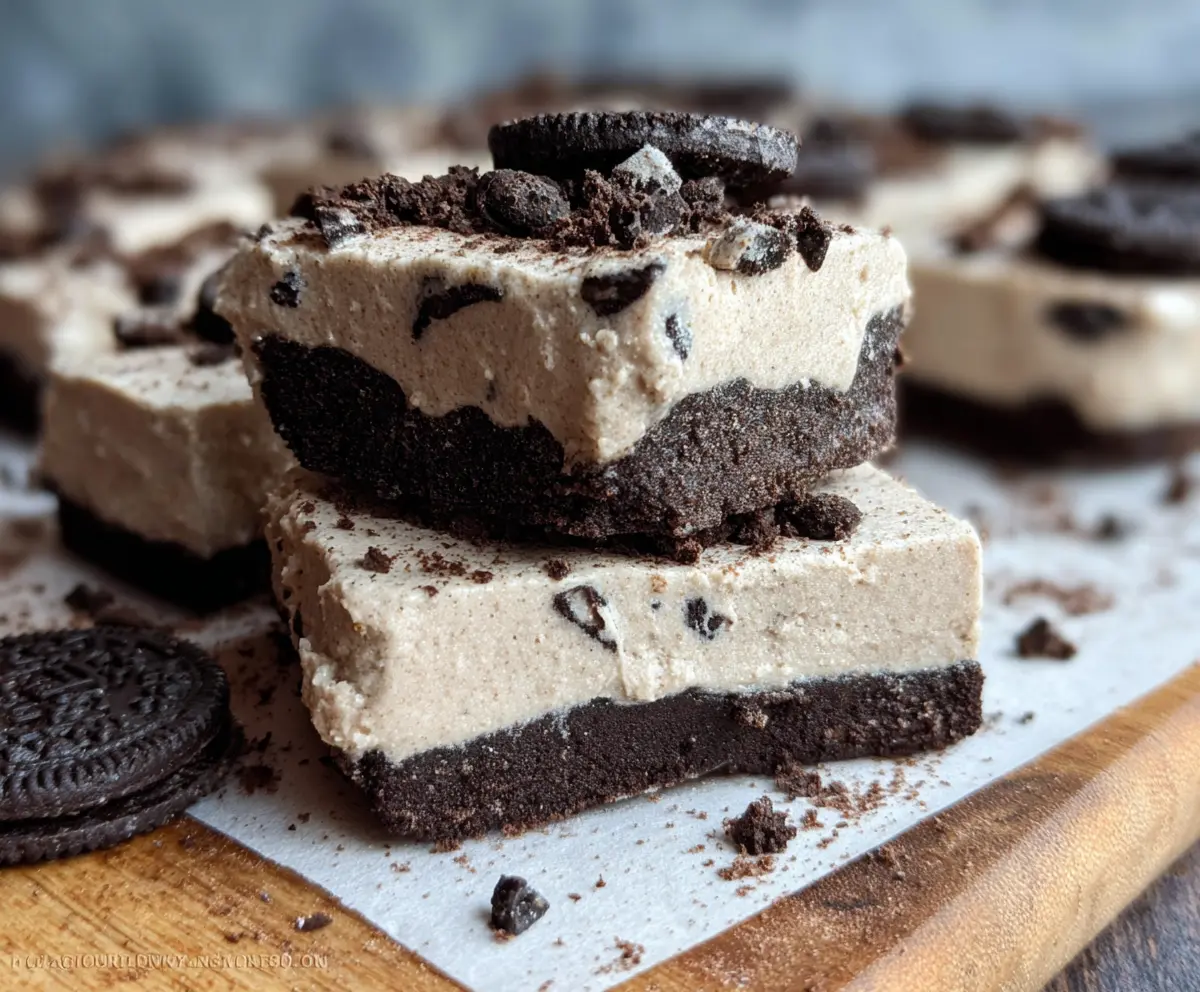
No Bake Oreo Protein Bars are a fun treat that combines the classic Oreo flavor with a protein boost! They’re easy to make and require no oven, just some mixing and chilling.
These bars are great for a quick snack or a post-workout pick-me-up. Trust me, you might want to stash a few away before they disappear—everyone will want to try them! 😄
Key Ingredients & Substitutions
Oreo Cookies: The classic Oreo is the key player in this recipe. If you want a twist, try using chocolate sandwich cookies or gluten-free alternatives if you’re avoiding gluten.
Protein Powder: Vanilla or cookies and cream protein powder works best for flavor. You could substitute with chocolate protein powder if you prefer a different taste or opt for a plant-based blend for a healthier option.
Cream Cheese: Softened cream cheese gives these bars a creamy texture. You can use Neufchâtel cheese, which is lower in fat, or for a dairy-free option, try a vegan cream cheese.
Greek Yogurt: Greek yogurt adds health benefits and creaminess. If you’re lactose intolerant, use a dairy-free yogurt, like coconut or almond. You could also skip it altogether and add more cream cheese if needed.
Honey or Maple Syrup: These natural sweeteners work well, but you can substitute with agave syrup or a sugar-free sweetener, depending on your dietary needs.
How Do You Achieve the Perfect Consistency for No-Bake Bars?
A smooth and spreadable mixture is essential for no-bake bars. Follow these tips:
- Soften cream cheese before mixing to ensure it blends easily without lumps.
- Gradually incorporate protein powder to avoid clumps. Use a mixer for a light and airy texture.
- Adjust the milk little by little. You want a thick mixture that holds together, but not so thick it’s hard to spread.
- Fold in crushed Oreos gently to maintain their crunchy texture while mixing.
Allowing the bars to chill long enough is crucial for them to set properly. Make sure to refrigerate for at least 3 hours before cutting them into bars. Enjoy your delicious snacks! 😋
No Bake Oreo Protein Bars
Ingredients You’ll Need:
For the Bars:
- 1 1/2 cups Oreo cookies, finely crushed (plus extra whole Oreos for topping)
- 1 1/2 cups vanilla or cookies and cream protein powder
- 1 1/2 cup cream cheese, softened
- 1/4 cup Greek yogurt or sour cream
- 1/4 cup honey or maple syrup (adjust to taste)
- 1/2 teaspoon vanilla extract
- 1/4 cup milk (or as needed for consistency)
- 1/3 cup dark or milk chocolate chips (for drizzling; optional)
How Much Time Will You Need?
This recipe takes about 15 minutes of preparation time, plus an additional 3 hours to chill in the refrigerator until set. So, you’ll be enjoying your delicious protein bars in about 3 hours and 15 minutes—not too long to wait!
Step-by-Step Instructions:
1. Prepare Your Pan:
Start by lining an 8×8-inch square pan with parchment paper. Make sure to leave some paper hanging over the sides for easy removal later. This will help you get your bars out without any hassle!
2. Make the Crust:
In a mixing bowl, combine the finely crushed Oreos with about 2 tablespoons of softened cream cheese. Mix until it sticks together well. Press this mixture firmly into the bottom of your prepared pan to create a nice, even crust.
3. Mix the Filling:
In a large bowl, add the softened cream cheese, Greek yogurt, honey (or maple syrup), and vanilla extract. Use a mixer or whisk to blend everything together until it’s smooth and creamy. This is where the magic happens—smooth and luscious!
4. Add the Protein Powder:
Gradually add in the protein powder, mixing until it’s fully combined. You want to ensure there are no lumps. After that, fold in the crushed Oreos gently using a spatula to keep some texture in the filling.
5. Adjust the Consistency:
If your mixture is too thick, add milk a little at a time until you reach a thick but spreadable consistency. It should look delightful and be easy to pour!
6. Assemble the Bars:
Pour the protein filling over the Oreo crust in the pan. Smooth the top evenly with a spatula. If you desire, drizzle some melted chocolate chips over the top for an extra touch of sweetness.
7. Chill and Set:
Refrigerate the bars for at least 3 hours. This chilling time is crucial for the bars to firm up and hold their shape when cut.
8. Cut and Serve:
Once set, lift the bars out of the pan using the parchment overhang. Cut them into squares or rectangles, and enjoy chilled. You can also top them with additional crushed Oreos or whole mini Oreos for an extra treat!
These No Bake Oreo Protein Bars are a delicious way to indulge your sweet tooth while getting a boost of protein. They’re rich, creamy, and completely delightful! Enjoy every bite! 😄
Can I Use a Different Type of Cookie for the Crust?
Absolutely! While Oreos give the bars their signature flavor, you can experiment with other sandwich cookies like chocolate cream cookies or gluten-free alternatives. Just aim for a similar texture so your crust holds together well!
How Do I Store Leftovers?
Store any leftover bars in an airtight container in the fridge for up to 5 days. These bars can also be individually wrapped and frozen for up to 2 months. Just make sure to let them thaw in the fridge overnight before enjoying!
Can I Make These Bars Dairy-Free?
Sure! Substitute the cream cheese with dairy-free cream cheese, use a plant-based yogurt, and choose a dairy-free chocolate for drizzling. Make sure your sandwich cookies are also dairy-free to keep the entire recipe compliant!
What If I Don’t Have Protein Powder?
If you’re out of protein powder, you could try using the same amount of finely ground oats or a nut flour, though the texture and protein content will change. You could also increase the crushed Oreo amount if you prefer a sweeter, less protein-packed treat!