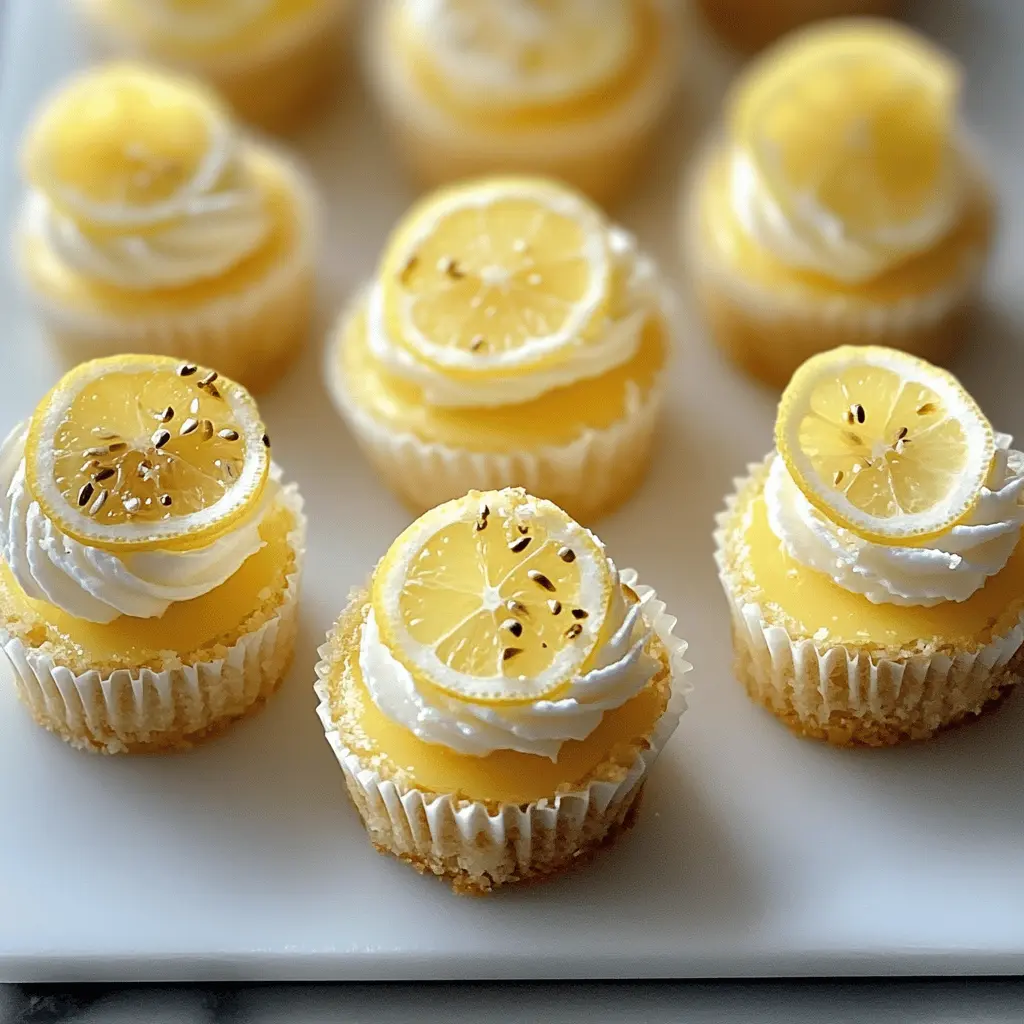
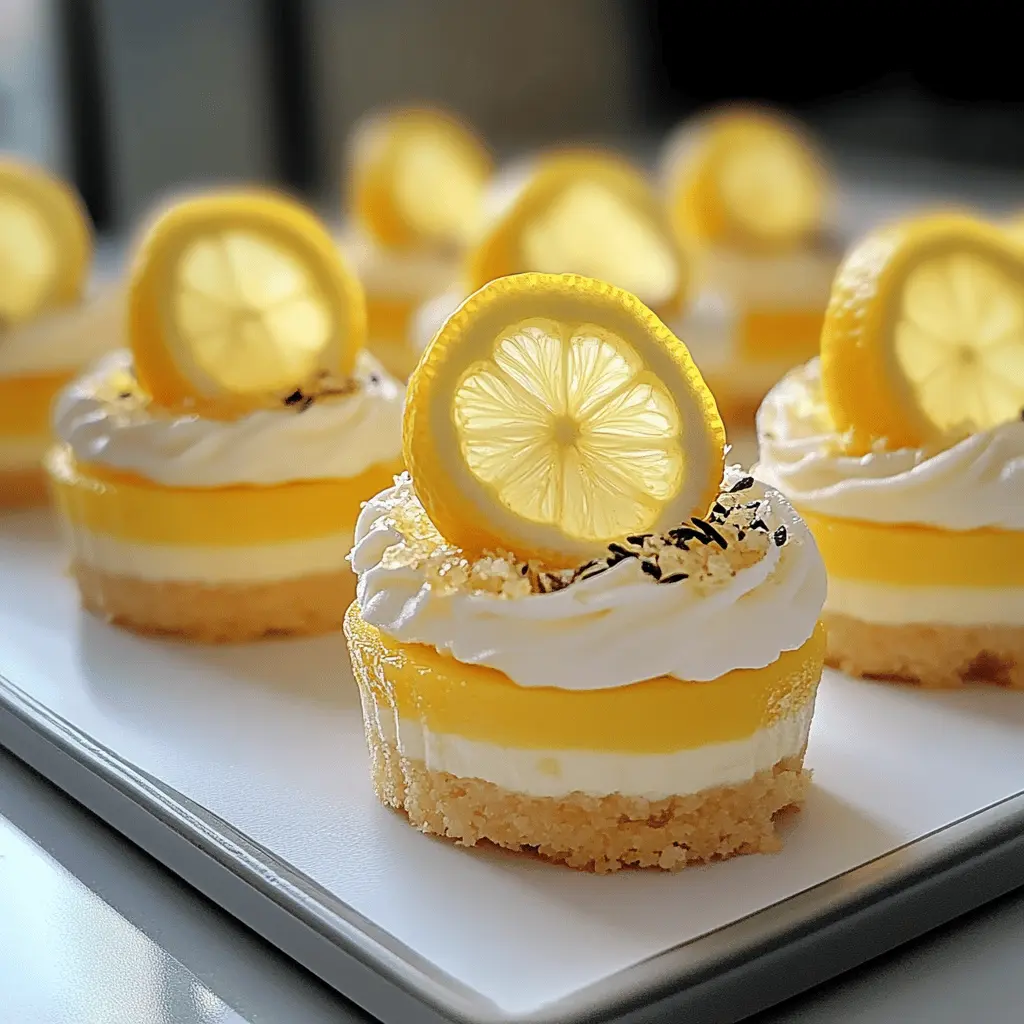
These mini lemon cheesecakes are like sunshine in a bite! They’re creamy, tart, and have a crunchy crust that will make your taste buds dance.
They’re perfect for parties or just a sweet treat at home. I love how easy they are to make, and I’m always tempted to eat more than one! 💛
Key Ingredients & Substitutions
Graham Cracker Crumbs: These crumbs create a sweet and crumbly crust. If you don’t have graham crackers, try using digestive biscuits or crushed vanilla wafers for a different twist.
Cream Cheese: The foundation of your filling! If you’re looking for a lighter option, use Neufchâtel cheese, which has less fat but similar taste. Vegan cream cheese is also a great substitute if you’re dairy-free.
Lemon Juice & Zest: Fresh lemon juice and zest bring that bright flavor. If fresh lemons are unavailable, bottled lemon juice works, but the zest won’t have the same zing. Substitute lemon with lime for a fun variation!
Heavy Whipping Cream: Essential for a fluffy topping. If you prefer a lighter option, you can use whipped coconut cream for a dairy-free alternative.
Why is Cooling Important After Baking?
Cooling is key for preventing cracks on your cheesecakes. After baking, turn off the oven and leave the door ajar. This gradual cooling helps the cheesecakes settle gently.
- Let them cool in the oven for about 30 minutes with the door open. This reduces temperature shock.
- Then cool to room temperature before chilling in the fridge. Chilling helps firm them up.
How to Make Mini Lemon Cheesecakes?
Ingredients You’ll Need:
For The Crust:
- 1 cup graham cracker crumbs
- 1/4 cup granulated sugar
- 1/2 cup unsalted butter, melted
For The Filling:
- 16 oz cream cheese, softened
- 1 cup powdered sugar
- 2 large eggs
- 1/4 cup fresh lemon juice
- Zest of 1 lemon
- 1 tsp vanilla extract
For The Topping:
- 1 cup heavy whipping cream
- 2 tbsp powdered sugar
- Lemon slices for garnish
- Poppy seeds for garnish (optional)
- Fresh mint leaves for garnish (optional)
How Much Time Will You Need?
This recipe requires about 20 minutes of preparation time and 15-20 minutes of baking time. Don’t forget to chill the cheesecakes for at least 4 hours (or overnight) before serving. In total, you’re looking at a few hours for the full process, but the actual working time is short and sweet!
Step-by-Step Instructions:
1. Prepare the Muffin Tin:
Start by preheating your oven to 325°F (160°C). While it’s heating up, prepare your muffin tin by lining it with lovely paper liners or grease it lightly so the cheesecakes come out easily later.
2. Make the Crust:
In a medium mixing bowl, combine the graham cracker crumbs, granulated sugar, and melted butter. Use a fork to mix them together until everything is well blended. Now, press about a tablespoon of this mixture into the bottom of each muffin cup firmly to create little crust bases. Pop them in the oven for about 5-7 minutes, until they’re lightly golden. Once done, take them out and let them cool while you prepare the filling.
3. Prepare the Filling:
In a large bowl, beat the softened cream cheese using an electric mixer until it’s nice and smooth. Gradually add in the powdered sugar, mixing until well combined. Then, add in the eggs, lemon juice, lemon zest, and vanilla extract. Keep mixing until the filling is smooth and creamy—this is the delicious part!
4. Fill and Bake:
Now, pour the lovely lemon filling over your cooled crusts, filling each muffin cup about 3/4 full. Carefully place the muffin tin back in the oven and bake for 15-20 minutes. You’ll know they’re done when the edges are set but the center still has a slight jiggle to it. Once baked, turn off the oven and let the cheesecakes cool in there with the door ajar for about 30 minutes to help prevent cracks.
5. Chill and Whip:
After they’ve cooled, take the cheesecakes out of the oven and let them cool to room temperature. Now, it’s time for them to chill in the fridge for at least 4 hours, or overnight for the best results. When you’re ready to serve, whip the heavy cream and powdered sugar together in a bowl until soft peaks start to form.
6. Serve and Enjoy:
To finish these mini delights, pipe or dollop the whipped cream on top of each cheesecake. Add a lemon slice, sprinkle with some optional poppy seeds, and top with fresh mint leaves for that extra touch. Now they’re ready to enjoy—dig in and savor those tasty mini lemon cheesecakes!
Can I Use Another Type of Cookie for the Crust?
Absolutely! If you’re not a fan of graham crackers, you can substitute them with other crushed cookies like digestive biscuits, vanilla wafers, or even Oreo cookies for a chocolate twist. Just ensure you use a similar amount and adjust the sugar if the substitute cookies are already sweet!
How Can I Make These Cheesecakes Gluten-Free?
For a gluten-free version, simply use gluten-free graham cracker crumbs or crushed gluten-free cookies for the crust. Always double-check labels to ensure that all ingredients are gluten-free, especially the cream cheese and whipped cream.
How to Store Leftover Cheesecakes?
Store any leftovers in an airtight container in the refrigerator for up to 5 days. If you need to keep them longer, consider freezing them. Just wrap each cheesecake individually in plastic wrap and then in aluminum foil. They’ll keep well for up to 2 months. Thaw overnight in the fridge before serving!
Can I Make These Mini Cheesecakes Without Eggs?
Yes! You can substitute the eggs with a mix of 1/4 cup unsweetened applesauce or 1/4 cup silken tofu blended until smooth for each egg. This will help maintain the cheesecake’s texture while making it egg-free. Enjoy your baking!