This Easter Bunny Cream Tart is a fun and festive treat that’s perfect for celebrating spring! With a crispy crust and a creamy filling, it’s a delight for all ages.
Making this tart is like turning dessert into art! I love decorating it with fruit and chocolate to give it that special bunny touch. It’s a sweet way to say “Happy Easter!” 🐰
Key Ingredients & Substitutions
Flour: All-purpose flour helps create a tender crust. If you want a gluten-free option, use a gluten-free blend specifically for baking. It’s worked well for me in other recipes!
Butter: Unsalted butter gives you control over your tart’s saltiness. If you need a dairy-free option, try using coconut oil or a vegan butter substitute. I find coconut oil works nicely, but it has a slight flavor.
Cream Cheese: Softened cream cheese is key for a smooth filling. You can swap it with ricotta for a lighter texture or Greek yogurt for a tangy twist. Just remember to drain excess liquid from Greek yogurt beforehand.
Heavy Whipping Cream: This is what gives the filling its light and airy quality. If you’re looking for a lighter option, use coconut cream or a non-dairy whipping cream. Both whip up nicely!
Chocolate Decorations: While I love using chocolate butterflies, you could replace them with chocolate shavings or fresh fruit for a fresh take. It also adds a different color and texture to the tart.
How Do You Get a Perfect Tart Crust?
Making the perfect tart crust is all about keeping the ingredients cold. This ensures a flaky texture. Here’s how to nail it:
- First, chill your butter and even the flour for a bit before starting. Cold gives great results!
- When mixing, pulse just until crumbly—too much mixing makes it tough.
- Wrap it tightly and let it chill for at least an hour. This helps the gluten relax.
Take the time to roll it out evenly; this ensures a consistent bake. If it cracks, just gently press it back together. No stress!
What’s the Best Way to Whip the Cream?
Whipping cream is essential for that airy filling! Follow these tips to get it just right:
- Use chilled equipment: Both the bowl and beaters should be cold. Pop them in the fridge beforehand!
- Start at a low speed to avoid splattering, then increase as it thickens.
- Stop whipping as soon as you see stiff peaks—over-whipping can turn it into butter!
Gently fold the whipped cream into the cream cheese to keep that airy quality. Use a spatula and a folding motion to combine without deflating it.
How to Make an Easter Bunny Cream Tart
Ingredients You’ll Need:
For The Tart Crust:
- 2 1/2 cups all-purpose flour
- 1/2 cup powdered sugar
- 1/4 teaspoon salt
- 1 cup (2 sticks) unsalted butter, cold and cut into cubes
- 1 large egg
- 1 teaspoon vanilla extract
For The Cream Filling:
- 1 cup heavy whipping cream
- 1/4 cup powdered sugar
- 1 teaspoon vanilla extract
- 8 oz cream cheese, softened
- 1/2 cup powdered sugar (additional for cream cheese mixture)
For Decorations:
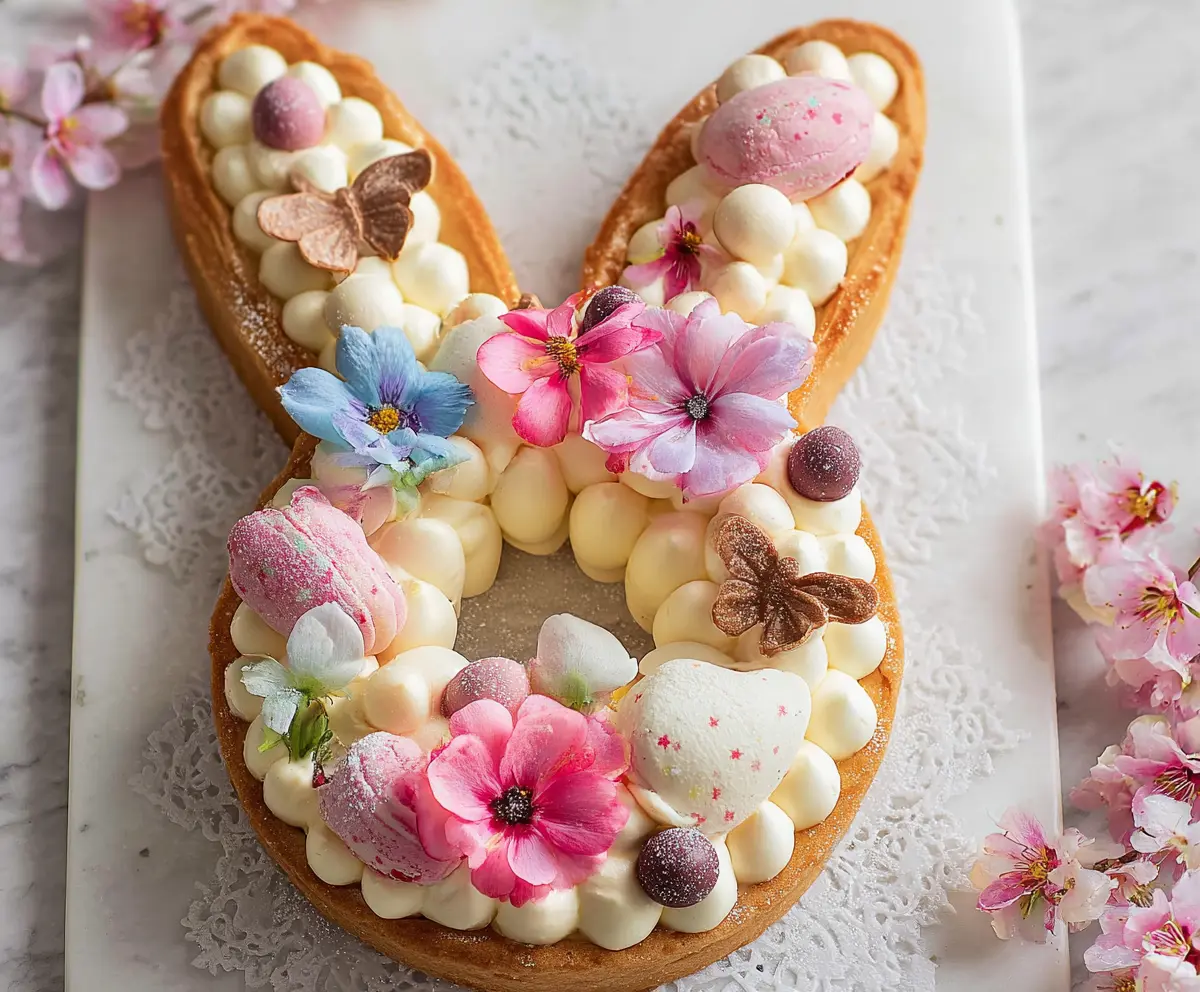
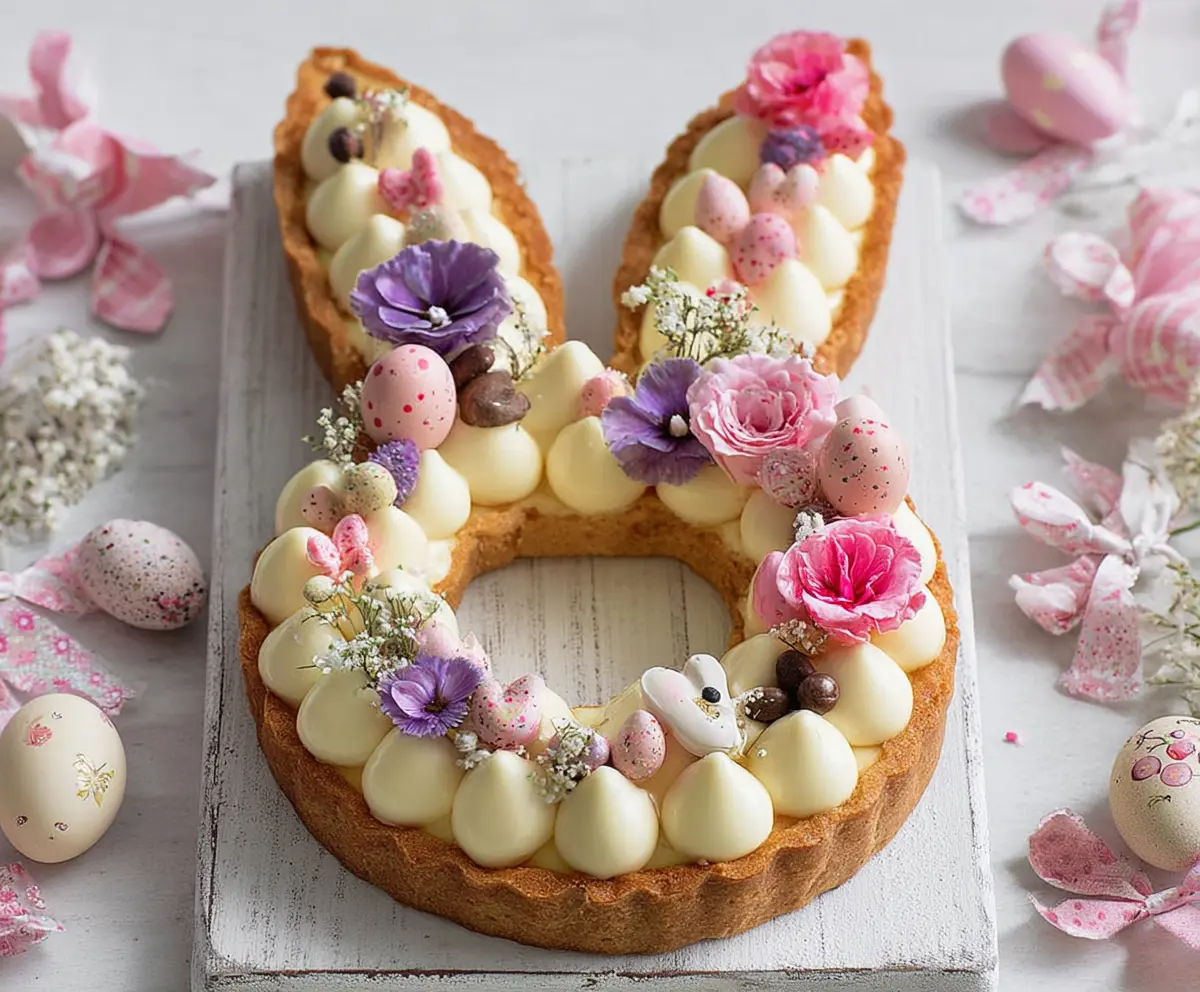
- Edible flowers (various colors: pink, purple, blue, white)
- Mini macarons (pastel colors, pink shown)
- Chocolate butterflies or edible chocolate decorations shaped like butterflies
- Small chocolate or candy eggs (pastel colored)
- Edible glitter or powdered sugar for dusting
How Much Time Will You Need?
This recipe will take about 30 minutes of active prep time, followed by at least 1 hour of chilling for the tart to set. You’ll also need to bake the crust for about 15 minutes. So, in total, plan for around 1 hour and 45 minutes including the chilling time!
Step-by-Step Instructions:
1. Prepare Tart Crust:
First, grab a food processor and pulse together the flour, powdered sugar, and salt until combined. Add the cold, cubed butter, and pulse again until the mixture looks like coarse crumbs. In a separate small bowl, beat the egg with the vanilla extract. Pour that into the food processor and pulse until the dough starts to clump together. Transfer the dough to a lightly floured surface, shape it into a disc, wrap it in plastic wrap, and chill for at least 1 hour.
2. Shape and Bake the Tart:
Once your dough is nicely chilled, preheat your oven to 350°F (175°C). Roll out the dough to about 1/4 inch thick. Using a bunny-shaped stencil or template, cut out two bunny shapes for each tart. Place one bunny cutout on a parchment-lined baking sheet and bake for about 12-15 minutes or until they turn lightly golden. Let them cool completely on a wire rack.
3. Prepare the Cream Filling:
In a medium bowl, whip the heavy cream with powdered sugar and vanilla until stiff peaks form. Set this aside. In another bowl, beat the softened cream cheese with the additional 1/2 cup powdered sugar until smooth. Gently fold the whipped cream into the cream cheese mixture until everything is nicely combined and smooth.
4. Assemble the Tart:
Take one cooled bunny tart crust and place it on a serving plate. Using a piping bag fitted with a round tip (about 1/2 inch nozzle), pipe dollops of the cream filling evenly all over the surface. Then, gently place the second bunny tart crust on top. Repeat the piping with more dollops of cream over the top crust.
5. Decorate:
Now for the fun part! Arrange your edible flowers evenly over the cream, focusing on the center and the bunny’s ears for a picturesque look. Space out mini macarons on the ears and body, and place small chocolate butterflies and pastel candy eggs among the cream dollops. Finally, dust lightly with edible glitter or powdered sugar for an extra festive touch.
6. Chill and Serve:
Pop your assembled tart into the refrigerator for at least 1 hour to let the cream set. Once it’s set, serve chilled and enjoy your delightful Easter Bunny Cream Tart!
This charming tart combines a crisp buttery crust with smooth vanilla cream, all beautifully adorned with spring-themed decorations, making it perfect for your Easter celebrations!
Can I Use a Different Type of Flour for the Tart Crust?
Yes! You can try using a gluten-free flour blend if you need a gluten-free option, or even almond flour for a different flavor and texture. Just keep in mind that almond flour may require adjustments in moisture!
How Do I Store Leftovers?
Store any leftover tart in an airtight container in the fridge for up to 3 days. Just be aware that the crust may lose some of its crispiness over time. For best taste, enjoy it fresh!
Can I Make the Tart Crust Ahead of Time?
Absolutely! You can prepare the tart crust in advance. Just roll it out, cut it into shapes, and freeze the uncooked cutouts. When you’re ready to bake, simply take them out of the freezer and bake directly from frozen—just add an extra minute or two to the baking time.
What Can I Use Instead of Cream Cheese?
If you’re looking for a lighter or dairy-free option, you can use mascarpone for a similar texture. For a healthier alternative, consider using Greek yogurt, but be sure to strain it first to reduce excess moisture.